Are you nervous about the direction digital or remote learning is going? Perhaps it’s because you don’t feel that confident about using a new digital platform, such as the wildly popular Google Classroom. Here’s a step-by-step guide to help you navigate this online world. In this post you’ll find everything you need to set up a classroom, add students, post assignments and announcements, communicate with parents, and keep a gradebook! Once you’ve mastered the system, it’ll be a huge help and timesaver! Check out this awesome guide prepared by Sheila Fredericks, AKA “Goddess of Technology” and Mary Culler. If you know the basics and want some tips, check out 5 TIPS TO MAKE TEACHING EASIER WITH GOOGLE CLASSROOM.
LET’S START WITH THE BASICS!
ACCESSING GOOGLE CLASSROOM
Go to https://classroom.google.com/ OR https://www.google.com/
-
- Click on the “waffle” in upper right.
- Click on the Google Classroom icon.

The Google Classroom icon may not appear at the top of your icons if you’ve never used it before. You can scroll down and see more features. Then, you can drag and drop icons to place them where you want them.
MAIN PAGE, CREATE A CLASS, AND RECOGNIZE SYMBOLS
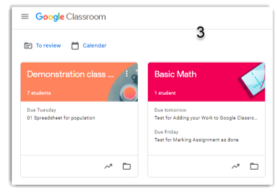
Once you are in Google Classroom, you can create your first class! The screenshot with numbers will explain what happens when you click each symbol or phrase.
-
- Click on the three lines to go to the Main Menu.
- Click the plus sign to create a class. Look at the image below to familiarize yourself with the symbols you’ll see once you’ve created your classroom and see what each one does!
- Click on “To review” to review work you’ve assigned.
- This area shows upcoming assignments.
- Click on the squiggly line to go to your gradebook.
- Click on the folder in the bottom right corner to access your class folder.
ADD A CLASS IN GOOGLE CLASSROOM
We promise it’s not that hard! When you add numbers, you use the plus symbol.
It’s the same here!
-
- Go to the main classes page.
- Click on the plus sign + in the upper right corner.
- Select Create class.
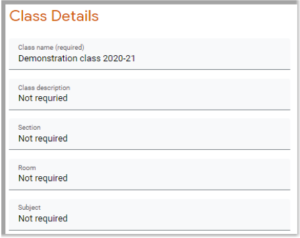
Type in Class Details
-
- Type in class name. This is required. If you use the class period before the name, the classes will be alphabetized by period number. (Pro-tip- you can also leave info for your students here, such as “Click the Google Meet Link each day at 9 AM!”
- Section, Subject, and Room are not required.
- Click on Create in the bottom right hand corner to create your class once you’ve entered the information.
GOOGLE CLASSROOM MENU ITEMS
From Google Classroom, you’ll want to familiarize yourself with the organizational features as you move between classes.
-
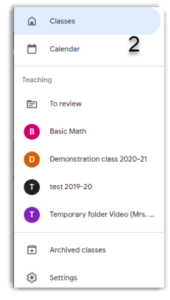
- Click on the three lines in the upper left (also known as “the hamburger”) for the Menu.
- The menu has the following items: Classes, Calendar, To-do, the classes you created or are co-teaching, Archived classes, and Settings.
- Click on Classes, and you will see the classes you set up.
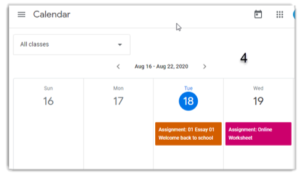
- The next item is your calendar, and it will show you anything that you’ve set up that has a due date.
This is important. If you don’t enter a due date to an assignment, it does not show up on your calendar or your students’ calendars.
a. The assignments are color-coded by the theme color of your class (see your main page).
b. You can add your own items for yourself, such as doctor’s appointments, etc., and they will only be visible to you.
c. You can view all your classes, or just individual classes by using the pull-down next to “All classes.”
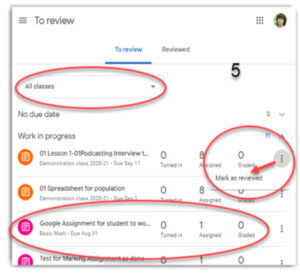
- The next section is “To review.” There are several parts to this:
a. You can view this by all classes or individual classes by using the pull-down, selecting the class.
b. The three dots let you mark each as reviewed and then removed it from the list.
c. The next section has your CLASSES in alphabetical order, and has the theme color. One hint, if you put the period number before the class, all your classes will be listed by period number, such as 01 English, 02 British Lit, etc.
- Archived classes: This includes all the classes that you’ve archived. When you archive the class, you might want to put the school year and semester to avoid confusion.
- Settings
- Click on the three lines in the upper left (also known as “the hamburger”) for the Menu.
In this important section, you’ll find a way to change your Profile settings: here you can change your profile picture, password, security options, and access other Google services. You’ll also be able to handle notifications and manage settings for your classes that you teach or are enrolled in.
THE CLASS PAGE:
At the top of your Classroom page, there are four all-important tabs: Stream, Classwork, People, and Grades. We’ll go over each section. There is also the Settings wheel, which we’ll discuss in detail, too.
First, take a look at your Google Classroom banner. There’s a spot that says “Generate Meet Link”. If you are using Google Meet to teach your students, generate a Meet Link and toggle the switch to let students see it. Now you don’t have to send out invitations each day (unless you want to) or create a recurring Calendar link. Your students can just click this link at their scheduled class time! The code will remain the same every day unless you regenerate it.
WHAT HAPPENS IN THE STREAM TAB?
The Stream tab is where you can post announcements. You can upload videos for students to watch. You can upload your e-texts. Type in reminders, encouragements, jokes of the day, and shout-outs. The Stream is like a message board.
The Stream will also show announcements to your class when you post assignments. To post those assignments, move over to the Classwork Tab!
WHAT HAPPENS IN THE CLASSWORK TAB?
The Classwork tab lets you create assignments. You can immediately see click on the Classwork tab on top
-
- Click on the + Create button to create an assignment
- Give the assignment a Title
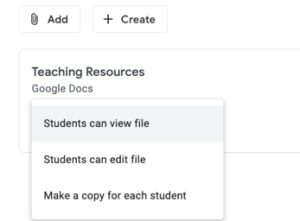
Add instructions - Use the paper clip to add a google doc or other attachment. If you add an attachment you must also make sure that you select the drop menu and select if you want students to view the copy, to make one copy for students to edit collectively, or to make a copy for each student.
- On the right side there are assignment settings. If your assignment is not for all your students, click the down arrow and choose the students you want to assignment.
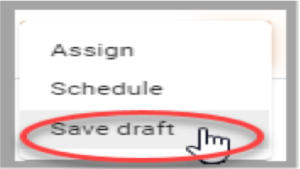
NOTE: you will only see the students that have joined the class, so if someone isn’t showing up, you can check in the People tab to see if they have accepted your class invitation. - In the assignments settings section, you can set the due date and grade category (from ones you’ve already set up) and point value. You’ll also be able to post the assignment right then, save it as a draft, or schedule it to post at a given time in the future.
Classroom Tab Settings
-
- Go to the “settings wheel” in the upper right.
- Go to the “settings wheel” in the upper right.
Class details
Class name is required. If you add the period before the class name, it will show them in order on the Google Class dashboard and make your life easier!
The other sections are not required, but you can definitely fill them in with specifics to help your students. However, only class name and section show up on the Class banner on your student’s screen unless they click for more information.
A helpful trick is to insert your class meeting time and instructions right into the Section setting! Then whenever kids click on your class, they’ll know when and how to meet (very useful if you’re teaching remotely.)
WHAT HAPPENS IN THE PEOPLE TAB?
In this tab, you’ll be able to add or remove students, co-teachers, and set up guardian summaries.
To add a co-teacher, go to the Teachers section and hit the small person + icon on the righthand side. You simply search for the person by name or email, then invite them by clicking the invite button!
To add students, go to the Students section and click the small person + icon on the righthand side. Add students by name or email or send them an invite link by clicking the invite button!
Once you have students in your class, you will see them when you click the People tab. They will be in the Students section. Next to each name, you will be prompted to “Invite Guardians.” If you do this, you can set up Guardian summaries. Guardian summaries allow parents and guardians to receive a weekly email about their students current and missing assignments, due dates, and more.
WHAT HAPPENS IN THE GRADES TAB?
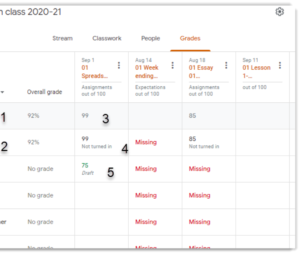
This tab shows you at a glance what is missing in your class, what the averages are, etc. Follow the numbers on the image below to see what it looks like.
-
- The class average of the classwork that has been graded AND returned.
- Student’s class average.
- Class average for each assignment.
- The student’s work has been graded, but the student did not “turn in” or “mark as done.”
- The student’s work has been graded, but if it has not been returned, the grade does not count towards his/her average or the class average.
These are the basics to get you started with Google Classroom. Did that seem like a lot? It was! (I hope the pictures were helpful!) Consider this post a beginner’s guide. Is there more that you can do on Google Classroom? Absolutely!
There are many tips and tricks to using Google Classroom that you will master as you go. The more you experiment and poke around, the more you will discover. Experimenting in a “Demo” class you create is a good way to build confidence before trying things out in actual student classes.
Now that you know the basics, read this blog on 5 TIPS TO MAKE TEACHING EASIER WITH GOOGLE CLASSROOM.


