Are you ready to rock your teaching? You are in the right place! I am going to share the 7 POWERFUL STEPS TO BE AN OUTSTANDING TEACHER! If you are familiar with Rockin Resources, you know that my key values are to MOTIVATE, EDUCATE, DIFFERENTIATE. I love to share ideas to help teachers and homeschool parents be the best they can be! As educators, we need to be able to motivate those little ones to want to learn and differentiate to meet the needs of each individual student. This post is going to focus on EDUCATE. We all educate, but do you use EXPLICIT TEACHING?
Once you know how to design your lessons according to the needs of your student(s), the next thing is to think about instruction. To make sure you teaching a lesson effectively, there are steps you can take. Every one of the steps are equally important.
1. ANCHOR CHARTS
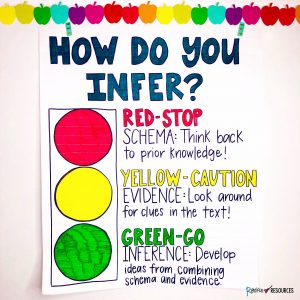
If you have every stepped into a classroom, you have seen an anchor chart. An anchor chart is a poster that gives the basic information on the skill being introduced. It provides enough information for students to take notes and enough so that you as the instructor remember what to cover. Anchor charts that add graphics will help with comprehension. The example above is used to teach students HOW TO INFER. I developed a stop light for the visual. It can be hand-made by the instructor or a digital poster displayed. If it is hand-made, it doesn’t have to be pretty. I know there are so many colorful anchor charts perfectly made. If you don’t have the time don’t worry. Sketch it out quick or get a digital poster to display on the white board. If you want to enlarge a digital poster, see HOW TO MAKE POSTERS FROM A PDF.
2. MENTOR TEXT
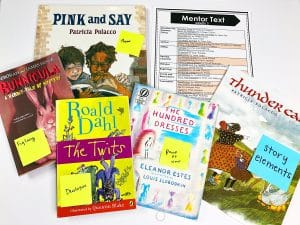
A mentor text is showing the skill in action. It shows the craft of a published author. Look on your library shelf. In any published children’s book, you will see some kind, if not numerous reading and writing skills. You can teach writing skills by showing students simple things like complete sentences, indents, and dialogue to more difficult skills like character development, word choice, and variety of sentences. You can teach reading skills by talking outloud on how to find them. What are the story elements, topic, or theme in the story? The above suggested mentor text list comes from one of my grade-level writing bundles. I like to provide my teachers with different books for each grade level so not every grade level is using the same list. It gives the students a variety of practicing the same skills throughout the years. Consistency is key! Show them mentor text of the same skill year after year! I’m also developing Amazon lists so you can see my suggestions. Some ideas are using Bunnicula to teach figurative language, Ramona the Brave for dialogue, Thundercake for story elements and crafting a title, and Pink and Say for theme.
3. MODELING
Students need to see you (the instructor) modeling the skill. They learned about the skill, they saw it in a published book, and now they are watching you apply it. It is completely ok if it is preplanned. This will make sure you are ready and have the confidence to show the students. The above example shows modeling a graphic organizer. Sometimes the teachers I work with feel they aren’t going to be able to write an effective class story with their kiddos. That’s ok. I have all the modeling planned out in my STEP-BY-STEP WRITING PROGRAM. It helps the teacher see first-hand how an essay is put together and be able to share it with students. It shows each step of the writing process within one piece of writing. Once they grasp how to each type of writing, then writing a class story comes so much easier to them. This is the same if you preplan it yourself. It will assure that everything is covered when you are modeling for the students. Once you get used to it, you can wing it! It is a learning process for you too!
4. NOTE-TAKING
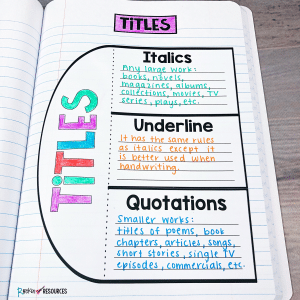
Keeping a notebook full of all the reading and writing skills provides a great reference for future assignments. When you teach a lesson, it isn’t a one and done. You spiral around to it throughout the year. Whether working with a small group or giving the student(s) an independent assignment, they can use their notebooks to remind themselves what you already taught and it helps them effectively master the skill. This of teaching allusions. Maybe you don’t get back to it for a few months. When you do, students may have forgotten about some of the tips and tricks you shared. When this happened in my classroom, I would model getting out my notebook and finding the lesson and say, “Lookie here! I can use my notes for reminders!” My personal preference is interactive notebooks (shown above). I like students to have one for writing and one for reading. If students have trouble with taking notes, offer sentence frames, or even a mini anchor chart with all the information to paste in their notebook. That way they all have the same information.
5. PRACTICE
Practice, practice, practice. Take time to let students practice the skill. Task cards are a great way to practice in centers, partners or groups. I like to offer task cards in a step-by-step fashion so they work their way up to a more difficult skill. For example: In writing, identify the topic sentence then write a topic sentence. In reading, theme is a difficult skill. I like students to learn about story elements, main idea, summarizing, topics, and lessons prior to identifying the theme.
6. APPLY
You have built the foundation of their learning, so now they have the tools they need to apply it in their own work. This is where you can see if they mastered the skill. Did you teach a mini lesson on word choice? Now see if they can add better word choice to their writing! Did you teach a mini lesson on summarizing? Now see if they can take a passage and summarize it.
7. SHARE
Don’t skip this part! Let your little rockstars show what they know! Share their knowledge. This gives your the opportunity to get excited for them. Do a happy dance. Celebrate event the smallest accomplishments. “You wrote in a complete sentence! Woo woo!” “I see you used your stop light when look for an inference! Way to go!” A small pat on the back goes a long way and students love to share. It can be in a small group, whole group, or just with you. It will solidify their learning.
I challenge you to try these 7 steps in your next lesson! I’d love to hear how it goes! You can find me on Instagram and Facebook. You can also join my Facebook Group and share it there!
If you would like to watch my Facebook Live on this session, check it out here:
Now go and rock your teaching!!!


